
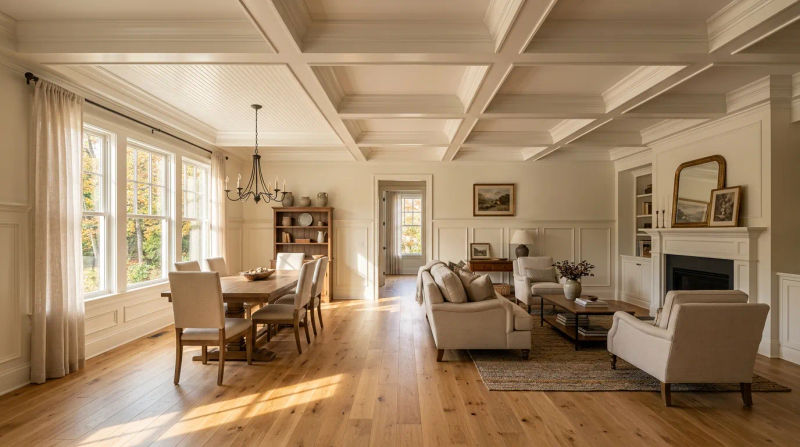
When a homeowner in Darlington, SC, called us at Absolute Remodeling And Repairs a few months back, they had a clear goal in mind. With the holidays approaching, they wanted to transform their main living and dining area from a simple, functional space into something truly memorable for their family gatherings. Their house, a classic 1950s brick ranch, had great bones but lacked the architectural character they craved. The ceilings were flat, the walls were plain, and the room felt a bit undefined. They didn't want a massive renovation; they wanted a high-impact upgrade that felt like it could have been original to the home. This is the kind of challenge I love to tackle because it’s all about precision, proportion, and craftsmanship.
The Assessment
During my initial visit, I could see exactly what they were envisioning. The room was a large, open-plan space typical of its era - long and rectangular. The challenge with adding significant trim work like a coffered ceiling and wainscoting to a mid-century home is getting the scale right. Go too big, and it can feel heavy and out of place. Go too small, and the effect is lost. My first step was to take detailed measurements of the entire room, noting window placements, doorways, and ceiling height.
We discussed the project at length. The client was specifically interested in a coffered ceiling Darlington homes often benefit from, as it adds a sense of height and grandeur. We talked about the grid layout - how many boxes, how deep the beams should be, and what style of crown moulding to use inside each coffer. I explained that at Absolute Remodeling And Repairs, we don't just build; we design. We used software to sketch up a few options, showing them how a 4x3 grid versus a 5x4 grid would change the feel of the room. We also determined the ideal height for the wainscoting, ensuring it would align visually with the window sills and create a cohesive, balanced look throughout the space.
One of my biggest considerations, especially here in South Carolina, is humidity. Wood and trim materials can expand and contract, and if the installation isn't done right, you'll see gaps and cracks within a year. We had to plan for a finish that would be stable and look perfect for the long haul.
Our Solution
Once the design was approved, our team at Absolute Remodeling And Repairs scheduled the work for early November, giving us plenty of time to complete the project before Thanksgiving. Our plan was methodical and designed to minimize disruption to the homeowners.
Our process for this paint-ready trim work coffered ceiling project involved several key stages:
- Layout and Foundation: We began by meticulously laying out the grid on the flat ceiling using chalk lines and lasers for perfect alignment. This is the most critical step. We then installed the base layer of 1x6 boards that would serve as the foundation for our beam grid. Every piece was glued and nailed securely into the ceiling joists for maximum stability.
- Building the Beams: Instead of using solid beams, we constructed hollow box beams on-site. This technique gives the substantial look of heavy timber without the immense weight and cost. Our carpenters precisely cut each piece, assembling the three-sided boxes that would form the sides of the coffers. This is where true craftsmanship shows - every miter cut has to be perfect.
- Wainscoting Installation: While one part of the crew worked on the ceiling, another began the wainscoting. We installed the chair rail and baseboard first, then custom-cut and fit each of the rectangular panels, creating the classic board-and-batten look the client wanted. Ensuring every reveal was consistent and every line was level is a point of pride for our team.
- Finishing Touches: With the main structures built, the final, detailed phase began. We installed decorative crown moulding inside each coffer to add depth and shadow. The most time-consuming part of any trim job is the prep work for paint. My team at Absolute Remodeling And Repairs is obsessive about this. Every single nail hole was filled and sanded. Every seam, joint, and corner was caulked with a high-quality, flexible sealant. We then sanded every surface to a smooth, uniform finish, ready for the painter.
The entire installation, from layout to the final sanding, was completed by our skilled crew in just five days. We made sure to clean the worksite thoroughly at the end of each day so the family could still navigate their home in the evenings.
The Results
The transformation was stunning. The custom ceiling grid carpentry before and after was like night and day. Before, the room was a simple, unadorned box. Now, it has a powerful sense of elegance and architectural integrity. The coffered ceiling draws your eye upward, making the entire space feel taller and more expansive. The deep shadows created by the beams add a layer of texture and sophistication that was completely absent before.
The wainscoting grounded the room perfectly. It provided a crisp, white visual anchor for the lower half of the walls, making the furniture placement feel more intentional and the entire room feel more complete. The proportions we planned during the assessment phase worked out beautifully; nothing felt forced or out of scale.
The homeowners were ecstatic. They told us the room finally felt